
A Beginner's Guide: Applying Vinyl Graphics to Glass
Vinyl graphics offer a simple yet impactful way to add a personal touch to your glass doors and windows. Whether you want to spruce up your home's decor or advertise your business, this beginner-friendly guide will walk you through the process step by step, ensuring that even those with no prior experience can achieve stunning results.
Materials You'll Need:
1. Vinyl graphic (pre-made or custom-designed)
2. Measuring tape or ruler
3. Isopropyl alcohol or glass cleaner
4. Lint-free cloths (like microfiber or paper towels)
5. Squeegee or a plastic card (e.g., an old credit card)
6. Painter's tape or masking tape
7. Scissors or a utility knife
8. A clean, well-lit workspace
2. Measuring tape or ruler
3. Isopropyl alcohol or glass cleaner
4. Lint-free cloths (like microfiber or paper towels)
5. Squeegee or a plastic card (e.g., an old credit card)
6. Painter's tape or masking tape
7. Scissors or a utility knife
8. A clean, well-lit workspace
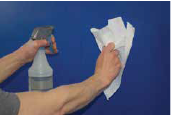
Step 1: Clean and Dry Surface
Before you begin the exciting process of adding vinyl graphics to your glass, it's essential to ensure that the surface is clean and completely dry. Cleaning the glass surface serves two crucial purposes: first, it removes any dust, dirt, or smudges that might hinder the vinyl from adhering properly. Second, it provides a smooth canvas for your graphic, resulting in a more professional and long-lasting finish.
Step 2: Place and Measure Graphic to Level or Desired Position
Now that your glass surface is immaculate, it's time to position your vinyl graphic. Begin by deciding where you want your graphic to go. Use a measuring tape or ruler to determine the exact spot where you'd like to place it. Mark these dimensions lightly with a pencil or use a piece of low-tack masking tape to create guide lines. This will help you align the graphic accurately and achieve the desired level or position.

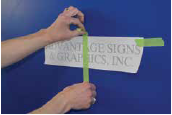
Step 3: Hinge Center with Tape
Creating a center hinge with tape is a smart technique that allows you to fine-tune the placement of your graphic before committing to the entire application. Take a strip of low-tack painter's tape or masking tape and apply it vertically down the center of the graphic, from top to bottom. This tape "hinge" acts as a pivot point, enabling you to make adjustments until the graphic is perfectly level and positioned just where you want it.
Step 4: Peel Transfer Tape from Backing Paper Slowly
The transfer tape is the semi-transparent layer that holds your vinyl graphic in place. It's time to gently peel it away from the backing paper, revealing the adhesive side of the vinyl. Do this slowly and carefully, ensuring that the vinyl sticks to the transfer tape as you go. Taking your time at this stage will make the process smoother and minimize the risk of damaging your graphic.

Step 5: Carefully Tear or Cut Away Backing Paper from Graphic
Now that your vinyl graphic is attached to the transfer tape, it's time to separate it from the backing paper. To do this, use scissors or a utility knife to carefully cut the backing paper, or you can gently tear it away from the graphic. Be cautious during this step, making sure not to pull on the vinyl itself, as it may cause distortion or stretching.

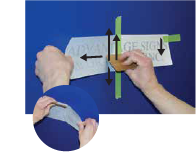
Step 6: Apply Graphic Outwards from Center Hinge
With the transfer tape now connected to your vinyl graphic, gently pivot the graphic into position on your glass, aligning it with your previously marked guidelines. Starting from the center hinge, press down on the top half of the graphic, gently adhering it to the glass. This technique allows you to make any last-minute adjustments while maintaining proper alignment.
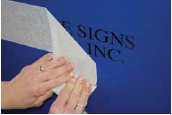
Step 7: Slowly Remove Transfer Tape
The time has come to fully commit to your graphic's placement. Starting at one end, slowly and carefully peel away the transfer tape from the graphic. Go at a 45-degree angle and maintain a steady, even pace. This process will secure the graphic to the glass while reducing the chances of air bubbles or wrinkles.
Step 8: Graphic Applied! Great Job!
Congratulations! You've successfully applied your vinyl graphic to the glass, and the result is undoubtedly a great addition to your space. Take a moment to step back and admire your work. The clean and level application of your graphic enhances the aesthetics of your glass surface, creating a polished and professional look. You've done an excellent job, and your glass now boasts a stunning vinyl graphic that reflects your creativity and style.


Other Services
Decals and labels for Minneapolis, St Paul and greater MN since 1988


We can serve your area from our location in Saint Paul
Arden Hills - Blaine, Minnesota - Circle Pines - Lino Lakes - Mounds View - North Oaks, MN - Shoreview - Spring Lake Park Fridley, Minnesota - New Brighton - Columbia Heights - Roseville, MN - Falcon Heights Little Canada, Minnesota - St. Paul, MN Maplewood - Maple Grove - Oakdale - Lake Elmo - Mahtomedi - White Bear Lake - Minneapolis, MN, - Rochester - Duluth
St Cloud, Minnesota - Woodbury - Minnetonka, Minnesota - Bloomington - Brooklyn Park - Plymouth - Eagan, MN - Burnsville Coon Rapids - Richfield - Eden Prairie - Lakeville
St Cloud, Minnesota - Woodbury - Minnetonka, Minnesota - Bloomington - Brooklyn Park - Plymouth - Eagan, MN - Burnsville Coon Rapids - Richfield - Eden Prairie - Lakeville